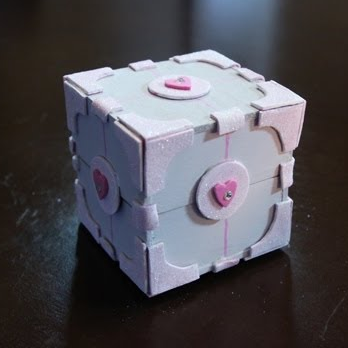
Hey Everyone! Valentine’s day is upon us so I wanted to do something special for the loved ones in your life! Or for yourself!
You’re going to need:
A piece of base wood (I bought mine at Michael’s)
A ruler
And a pencil
Let’s create and mark some squares 3-inches apart, top and botton so we can create a 3×3 square (8 sides total)
Then draw a line down the center of all the squares (because I want the cube to open exactly at the middle)
Measure an 1/8 of an inch on four squares (but it depends on the thickness of your wood. Mine is 1/8 inch thick)
Once you’re done measuring cut your squares! You should have the following squares in these sizes:
Now grab some sand paper and sand down any rough edges
You are now ready to begin gluing. We’re going to be using Gorilla Wood Glue. Grab a 1 1/2 inch side and glue on top of the base. Dry for about 3 minutes and then proceed to glue the opposite side. Next, glue the remaining open spaces with your two 1 3/8 inch sides. You can clamp it afterwards to ensure stability.
Repeat for the other base as well.
Now use some foam paper to make a 1 x 1 inch cross (I’m using pink, but I’d prefer you to use white as you’ll be able to stick a step later – painting these pieces white). Use a water bottle cap to make some indentations at the corners
Cut along the indentations you made with the water bottle (you’re going to want to make 6 of these for each side)
Measure a 1/2 inch rectangle and mark 1/2 inch spaces to create some more pieces for our cubes
Using the same cap, make six more circles. Let’s start painting our pieces white (2 coats to let the paint seep into the foam)
I want it to be a little bit girly so I am adding some sparkles
Mix some light gray (acrylic) and begin painting your wooden box gray (inside also)
Now let’s add some lace to the interior of the box. Add some glue to the two interior portions and glue your lace (or other appropriate fabric). This will allow the box to open and keep the pieces together. Let it dry completely
I am now painting the interior of the box with black paint, “the cake is a lie.”
Use a miniature heart cookie cutter to create an indentation on your foam paper and cut it out. 6 pieces total
Glue them to the white circles
Now glue on all your pieces
For the back side, cut the heart circle in half (to allow the box to open)
I added some rhinestones to the heart to make it more girly. And for the final step, get some pink paint and paint some center lines for the cube.
We’re all done! This HAS to be my favorite item I have made for DIY GG! If you decide to do this, I would love to see it! You can tweet me an image at @ihascupquake
Thanks for watching!
The post Weighted Companion Cube Box appeared first on iHasCupquake.


