Hey everyone! For today’s Holiday edition of DIY GG, we’ll be making a Zelda Navi Ornament! For those of you who may not be familiar, she is Link’s persistent and helpful fairy guide. Let’s get started!
You’ll need:
Decorative Fillers (Or glittery modpodge styrofoam balls)
 Wire
Wire
 Scissors
 Pliers
 Iridescent paper (Or wax paper)
 Pen/paper
 Glue (Fabri-tac or Fabric fusion)
First, grab a sheet of paper, place your glittery ball on top and sketch one side of Navi’s wing. You can make her wings as big or small as you like
Then use your sketch as a guide and follow it with your wire and pliers. Be sure to leave a little bit of excess wire which will go inside the ball
Do the above for all four wings. Next, grab some iridescent paper and fabri-tac (or any other glue) and glue your wire wings in between 2 sheets of said paperAfter the wings are done drying, cut the excess paper as close to the wing as possible. Leave a little expose wire and we’ll insert this into the ball
Insert all the wings and remove them to add some glue to the holes. After you’ve added glue, stick the wings back in
Grab your wire and create a loop (which will serve to hold your ornament). Soften the edges and poke a hole with the looped wire and glue/reinsert into ball
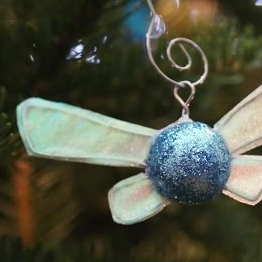
And we’re finished! Here’s the end result!
And here’s the vid if you prefer that! 
The post Navi Ornament – Zelda – DIY GG appeared first on iHasCupquake.


